One of the many benefits of using SmarterTrack is the ability to use a single installation to support multiple different Brands. That means you can use one hosted SmarterTrack site to support multiple different businesses.
However, there may come a time when it’s necessary to separate your hosted SmarterTrack installation and move a Brand to its own hosted account. There are a number of reasons this may be necessary, such as hiring new Agents for a secondary Brand, but you don’t want the new Agents to know about the other Brand(s) being served by your installation.
Regardless of the reason, transitioning a second, or third, or fourth Brand out into its own hosted SmarterTrack site is a simple process. PLEASE NOTE: The PRIMARY Brand cannot be moved or deleted. This article will ONLY apply to Brands other than the primary.
The FIRST thing you’ll want to do is sign up for a new hosted SmarterTrack site. Once that’s up and running you’ll be ready to start transitioning Departments, Groups, Agents and tickets to your new site.
Preparing your original site for the transition
Before you can start transition process, you’ll want to do a few things to prepare for the move. One of the most important steps is stopping the POP import for any Group that will be moving to the new installation. This will ONLY stop the import of new tickets -- any tickets already in SmarterTrack will remain.
Next, you’ll want log in to each POP email account that will be moving over and “archive” any items in the Inbox that have already been imported into SmarterTrack. This will ensure that you have a clean POP import in the new SmarterTrack site versus downloading all email that has ever been received and starting NEW tickets in your new installation. You can simply create a new folder called “Ticket Archive” and then move those emails into that folder.
REST EASY: even if you move emails associated with an ongoing issue, as long as the ticket in SmarterTrack is properly transferred to your new site, when a customer replies to a ticket it will be associated with the existing item in your new SmarterTrack site.
Starting the transition
Once you’re finished preparing the “old” SmarterTrack site, you’re ready to start transitioning your Brand over to the new SmarterTrack site.
- Create a primary Brand in new site that’s based on the Brand you’re moving over.
- Create the appropriate Departments and Groups for the Brand.
- Identify the Agents you’d like to transfer from the original install, then create those logins in the new site and associate them to their respective Groups.
- DO NOT TOUCH THE POP OR SMTP SETTINGS JUST YET.
- Head back over to the original SmarterTrack site and navigate to Settings -> Configuration -> Connected Services.
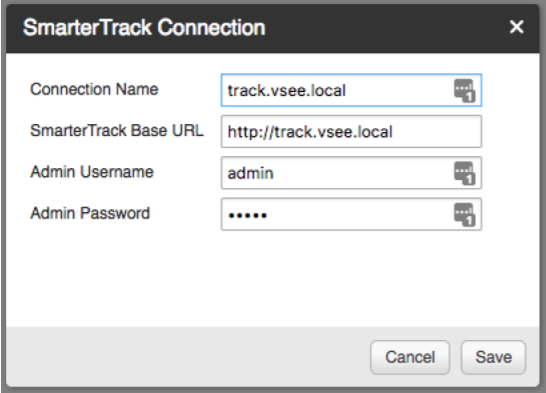
- Select the SmarterTrack Connections tab and hit Add.
- Enter in the connection information for the NEW site you’ve set up.

- BE SURE TO SAVE THE SETTINGS.
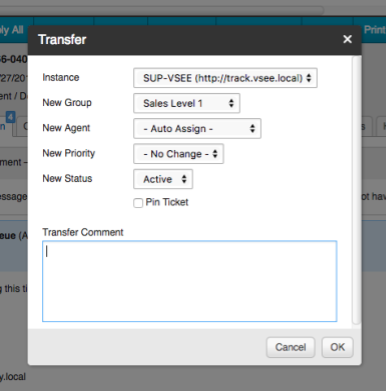
- Next, locate a ticket that you would like to transfer to the new installation. Click the Actions button, and select Transfer.
- In the Transfer window, select your new installation as the Instance, and then select the Group and Agent the ticket should be assigned to. As you’re simply transferring the ticket, you can also set the priority and status as well as add any comments, just as you do when transferring tickets between Departments and Groups. Please note that transferring tickets will default the status as Active, so if you are transferring waiting or closed tickets ensure the proper status is selected.

- Hit OK
- You can then sign into the new SmarterTrack site to confirm the transfer was successful.
- You’ll want to do this for all tickets you want moved over to the new site. It IS possible to mass transfer tickets to the new installation, but a “best practice” is to transfer tickets by status for each agent: so all Active tickets for Agent1, Waiting tickets for Agent 1, Closed tickets for Agent 1, then Active tickets for Agent2, etc. Do this for every Group that’s being transferred.
- Once all tickets have been transferred over, you’re now ready to set up POP and SMTP for the Groups as needed.
- On the secondary installation repeat steps 5-9 to add the connection to allow two way transferring of tickets ONLY if the two installs require ongoing communication between the two. If this is a one-time transition, you can remove the Connected Service from your original SmarterTrack site as it will no longer be needed. However, to make sure things are working as intended, it may be a good idea to keep the connection active so tickets can be transferred on the off chance something was missed.
- Once this is all completed and things are running smoothly, you can go ahead and delete the Brand from your original installation.